
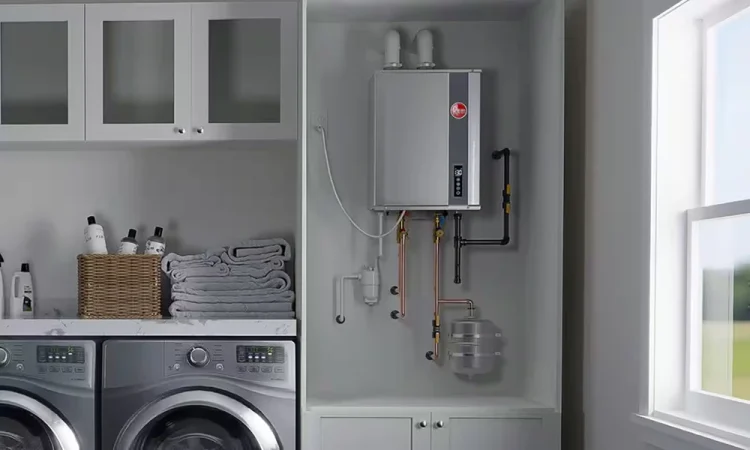
Upgrading to a tankless water heater is a worthwhile investment since it may increase comfort, energy efficiency, and overall plumbing system performance. Unlike traditional storage tank units, tankless water heaters provide hot water only when it is needed, making them an appealing option for homeowners looking to reduce energy waste and enjoy a continuous supply of hot water.
While the benefits are easy to understand, many homeowners are unsure about what actually happens during the tankless water heater installation process. Knowing what to anticipate reduces surprises and ensures that the project runs well from beginning to end.
An Initial Assessment Of Your Home
Every professional installation begins with a careful evaluation of the home’s plumbing system. A certified plumber will evaluate the current water heater, water supply lines, gas or electrical connections, and ventilation needs before proposing the best tankless unit.
The installer will also determine whether the current plumbing layout can support the new system or if modifications are necessary. This assessment ensures the equipment is properly matched to the household’s hot water demand, preventing performance issues later.
Choosing The Right Installation Location
Tankless water heaters have the benefit of being small in size. However, selecting the ideal location remains an important part of the installation process.
Professionals consider several factors when choosing where the unit will be mounted. Accessibility for future maintenance, proper ventilation, water line connections, and safety clearances all play a role. The goal is to position the unit where it operates efficiently while remaining easy to service if maintenance is required in the future.
Removing The Existing Water Heater
If an older water heater is already installed, it must be safely disconnected before the new system can be installed. Professionals first shut off the water, electricity, or gas supply before draining the existing tank.
Once disconnected, the old unit is carefully removed without damaging surrounding plumbing or flooring. Proper disposal is also part of the service, saving homeowners the inconvenience of handling heavy equipment themselves.
Preparing The Plumbing Connections
Tankless systems often require adjustments to existing plumbing lines. Depending on the home’s configuration, installers may replace older pipes, install new shutoff valves, or upgrade water connections to match manufacturer specifications.
These improvements help maintain steady water flow while protecting the system from unnecessary wear. Proper plumbing preparation is essential for reliable operation and long-term efficiency.
Installing Gas, Electrical, And Ventilation Components
Every tankless water heater has specific utility requirements. Gas-powered units may require larger gas supply lines, while electric models may need upgraded electrical circuits to safely handle the increased power demand.
Ventilation is equally important for gas-powered systems. Professional installers ensure exhaust gases are safely directed outside the home through approved venting materials. These steps are completed according to local building codes and manufacturer guidelines to maximize both safety and performance.
Mounting And Connecting The Unit
After making all necessary connections, the tankless water heater is firmly installed to the wall. Water lines, gas lines, electrical wiring, and venting components are connected with precision to minimize the risk of leaks or operational problems.
Experienced installers also verify that all fittings are properly sealed before moving to the testing phase.
Thorough System Testing
Installation is not complete once the equipment is connected. A professional plumber performs multiple tests to confirm everything functions correctly.
The installer checks for water leaks, gas leaks where applicable, proper ignition, water pressure, temperature consistency, and overall system performance. Every safety feature is verified before the system is considered ready for daily use.
Testing allows small adjustments to be made immediately, ensuring homeowners receive dependable hot water from the first day of operation.
Learning How To Operate Your New System
Professional installation also includes educating the homeowner about the new equipment. Installers explain how temperature controls work, where shutoff valves are located, and what routine maintenance should be performed.
Many homeowners are surprised to learn that tankless water heaters require occasional flushing to reduce mineral buildup, especially in areas with hard water. Understanding these maintenance requirements helps extend the lifespan of the system while maintaining peak efficiency.
Why Professional Installation Matters?
Installing a tankless water heater involves much more than replacing one appliance with another. Plumbing modifications, electrical work, gas line adjustments, ventilation, and safety testing all require specialized knowledge and experience.
Professional installation lowers the likelihood of incorrect connections, code violations, decreased efficiency, and expensive future repairs. It also ensures manufacturer warranty requirements are met, giving homeowners additional peace of mind.
Conclusion
A professional tankless water heater installation follows a carefully planned process designed to maximize safety, efficiency, and long-term reliability. From evaluating the home’s plumbing system to testing the finished installation, every step contributes to dependable performance for years to come.
Understanding what happens during the installation process allows homeowners to prepare with confidence and appreciate the value of hiring experienced professionals. With appropriate installation and frequent maintenance, a tankless water heater may deliver reliable hot water, increased energy efficiency, and long-term comfort for the whole home.